
This is my painting that I entered into the American Watercolor Society‘s 149th Annual International Exhibition. To my delight it was accepted, and because it is my third time, it means I will receive the coveted Signature Status, allowing me to add “AWS” after my signature on my watercolor paintings. A signature status means that an artist has met the required standards of an art organization signifying a high skill level and achievement in a specific medium. The American Watercolor Society (AWS) is the oldest watercolor organization in the US and had their first annual exhibition in 1867. A few past distinguished members are Winslow Homer, Louis Comfort Tiffany, Edward Hopper, William Merrit Chase, Thomas Eakins, Samuel Colman, Charles Burchfield, Gladys Rockmore Davis, Childe Hassam, John LaFarge, Alphonse Mucha, Edward Potthast, Mahonri Young and Andrew Wyeth. I feel honored to be accepted as a signature member and follow in their footsteps!
A few years ago I earned the signature status in the National Watercolor Society (NWS), which is only half as old as the AWS. It has a similar requirement/process. I was just as excited at that time because for both shows I had been rejected for many years and I was ready to give up entering. My persistence paid off! So now I have the status for both of the largest US watercolor organizations. For the American Watercolor Society, the criterion is to get accepted into the annual International Exhibition three times. This is a very difficult accomplishment since getting in just once is a challenge! Each competition has 1200-1600 entries from around the world. The artist may only submit one image for review, there is an entry fee and entries are submitted digitally. The entries are viewed independently by 5-6 jurors, who must all concur (without discussion). Approximately 140 – 150 paintings are selected to be in the exhibit, so jurors must continue viewing the entries until they select the designated number of paintings. The original art is then shipped, at the artists cost, to the show in New York. Then the art is reviewed in person by an awards jury, who are three different jurors from the selection jury. Any artist qualifying for the signature status is judged separately and must submit two paintings to be juried.
The entire process is quite extensive. As I commented in a previous post, jurors must be exhausted after reviewing art because if they view each image for 30 seconds that would be about 12 hours for the first round of screening. It gives one a better understanding of why it is so important to submit a good photo of your art and the painting needs to be exceptional. An image only has a few seconds to catch the juror’s attention, so it needs to stand out. There are also size requirements and media limitations to be mindful of (no collage or non-water based medium). Also, entries must be from an original source, painted in the past 2 years and not shown in another national or international competition.
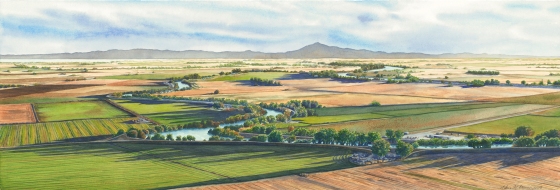
The accepted painting, “Diablo’s Delta,” is from a flight I took with a local pilot. Look closely at the lower right corner, far side of the river and you will see the hangar and little air field we flew out of. We flew late in the day over the Sacramento Delta and you can see Mt. Diablo in the background. It was an amazing flight in a very special plane. I will add more about the flight and plane in a later post.
If you are in New York City be sure to see this great show. You won’t be disappointed! It’s at the Salmagundi Club, 47 Fifth Ave., NY, NY 10003 from April 4-23, 2016. Selected paintings will then travel around the country to about 8 cities in the next year. Catch the 2015 traveling exhibit at its last stop here in Sacramento, CA. It is at the Sacramento Fine Art Center through April 9, open daily 10-4. The location is 5330-B Gibbons Dr., Carmichel, CA 95608.


 of gouache that are added to highlight and define some details lost along the way. White gouache is commonly used to bring back small areas of white paper that were lost or difficult to save, such as a small reflection. Gouache is an opaque watercolor, which would be similar to an artist grade poster paint. I find it works well to add a few leaves and foliage in areas that have a dark color. I can paint light color foliage over a dark shadow. Otherwise it would be very difficult to save very small areas of light color unless they were masked out. Gouache is also a watercolorists’ secret trick to fix little ‘mistakes’ that otherwise couldn’t be saved. After I finish the right side of the painting I will need to think of a title. For me that is always a challenge – to come up with an interesting title that captures the essence of the painting. If you have any suggestions, please let me know! Finally I will need to sign the painting. I have a rule for myself that once I sign a painting it is done and I don’t go back to make changes. Otherwise I could work on a painting forever and never consider it done! So sometimes it will sit a few days after its finished so that I can be sure I am ready to sign my name to it! Hopefully I will have it completed for the upcoming studio tour.
  Here is my new watercolor painting in progress. The inspiration for the image is from when I went flying over the Sacramento River and farmlands in California. I flew in a 1940’s Piper Cub plane, which can fly very low (about 75-100 feet) and can fly slow (about 75 mph). It was perfect for taking photos to paint my aerial landscape paintings. I got to sit in the ‘front’ of the plane while the pilot sat behind me. It was quite an experience because I was looking out the front window and the instrument panel was in front of me with the controls moving on their own.
